
Automation of Pre-built indicators on Tradingview
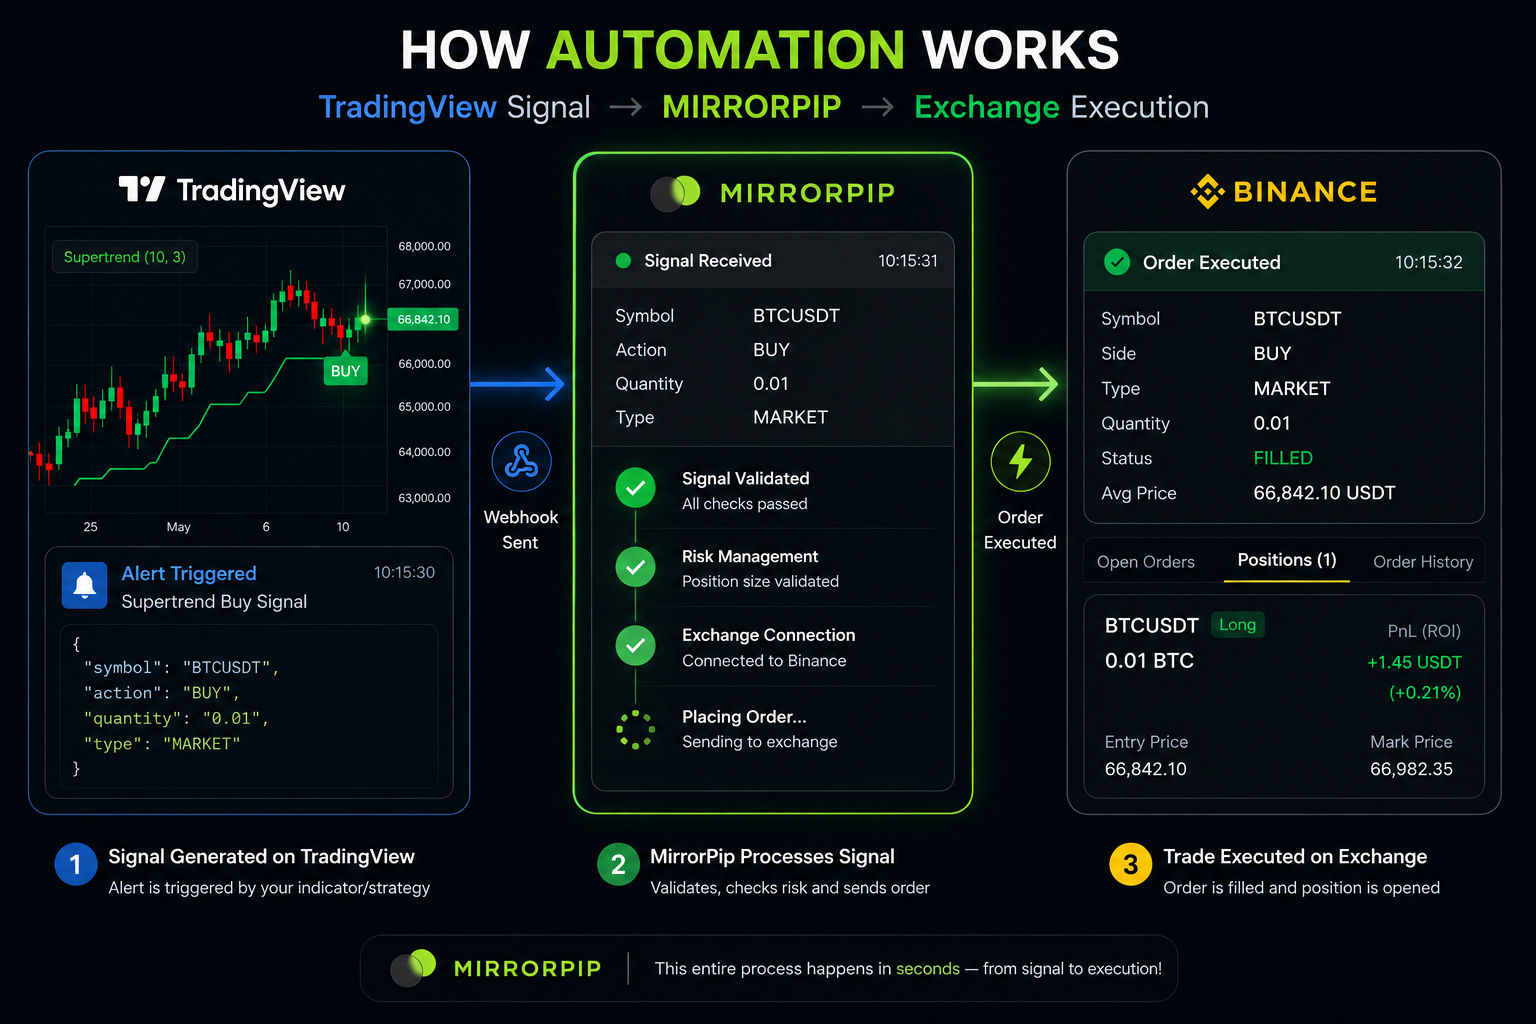
Step-by-Step Guide: How to Automate Pre-Built Indicators on TradingView Using MIRRORPIP
Automating pre-built indicators on MIRRORPIP allows traders to convert TradingView signals into real trades automatically.
You do not need advanced coding skills to get started.
Using TradingView alerts and MIRRORPIP webhook automation, you can automate popular indicators like:
- Supertrend
- EMA Crossover
- RSI
- MACD
- Bollinger Bands
- VWAP
- Moving Averages
- Breakout Indicators
This guide explains the complete setup process step by step.
What You Need Before Starting
Before automation setup, ensure you have:
Requirements
- A TradingView account
- A MIRRORPIP account
- Exchange API connected to MIRRORPIP (We support 8+ crypto exchanges)
- Trading permissions enabled on exchange APIs (we have detailed documentation per exchange)
- A chart with your preferred indicator
Step 1 — Open TradingView
Go to:
Open the chart of the coin or trading pair you want to automate.
Example:
- BTCUSDT
- ETHUSDT
- SOLUSDT
Step 2 — Add a Pre-Built Indicator
Click:
Indicators → Search Indicator
Now choose any prebuilt indicator.
Popular examples:
| Indicator | Usage |
|---|---|
| Supertrend | Trend following |
| RSI | Overbought/Oversold |
| MACD | Momentum |
| EMA Cross | Trend confirmation |
| Bollinger Bands | Volatility trading |
Step 3 — Configure Indicator Settings
Adjust the settings according to your strategy.
Example for Supertrend:
| Setting | Example |
|---|---|
| ATR Period | 10 |
| Multiplier | 3 |
Example for EMA Cross:
| Setting | Example |
|---|---|
| Fast EMA | 20 |
| Slow EMA | 50 |
You can backtest different configurations before automation. (Backtesting is free on Tradingview but needs coding)
Step 4 — Create an Alert
Once the indicator is added:
Click the Alert button on TradingView.
Now configure:
Alert Condition
Choose your indicator signal.
Examples:
- Supertrend Buy Signal
- EMA Cross Up
- RSI Crossing 30
- MACD Bullish Cross
Alert Frequency
Usually:
- Once Per Bar Close
This helps reduce false signals.
Step 5 — Enable Webhook URL
Inside alert settings:
Enable:
✅ Webhook URL
Now paste your MIRRORPIP webhook URL.
MIRRORPIP provides this webhook URL inside the automation section/dashboard. The URL is static and never changes
Copy this URL for all alerts
https://trade.mirrorpip.com/tradingview
Step 6 — Add Alert Message Format
TradingView sends this message to MIRRORPIP.
Example BUY alert:
[
{
"exchange": "coinswitch",
"price": "{{close}}",
"chart_symbol": "{{ticker}}",
"order_type": "buy",
"instrument_type": "NA",
"quantity": "100",
"tp": "20",
"sl": "10",
"code": "68ZXXQADFEQZA7N0"
}
]
Example SELL alert:
[
{
"exchange": "coinswitch",
"price": "{{close}}",
"chart_symbol": "{{ticker}}",
"order_type": "sell",
"instrument_type": "NA",
"quantity": "100",
"tp": "20",
"sl": "10",
"code": "68ZXXQADFEQZA7N0"
}
]
This tells MIRRORPIP exactly what order to execute.
Step 7 — Save the Alert
Click:
✅ Create Alert
TradingView now continuously monitors the market automatically.
Step 8 — Connect Exchange on MIRRORPIP
Inside MIRRORPIP:
- Go to Trading account
- Connect your exchange API key and secret
Supported exchanges may include FIU-compliant crypto exchanges available in India.
Step 9 — Activate Automation
Inside MIRRORPIP: You need to add the symbol in watchlist to ensure the automation occurs seamlessly.
Example : If on Tradingview you have deployed supertrend on BTCUSD, on Mirrorpip go to watchlist section and add BTCUSD as symbol and configure its order type (Market/Limit), you can also hard code TP/SL and QTY in Mirrorpip if you don't want to use those parameters in Tradingview.
Step 10 — Test Using Small Quantity
Before going all in:
✅ Test alerts first with small quantity.
Recommended testing process:
- Use small quantity
- Trigger manual alert
- Verify order execution
- Check exchange positions
- Monitor webhook logs
This helps avoid configuration mistakes.
Example Automation Workflow
Here’s a simple real-world example:
Strategy
Supertrend Buy/Sell Automation
Workflow
- Supertrend turns bullish
- TradingView alert triggers
- Webhook sent to MIRRORPIP
- MIRRORPIP places BUY order automatically
- Supertrend reverses
- SELL alert triggers
- MIRRORPIP exits the position
Entire process becomes fully automated.
Best Indicators for Beginners
If you're new to automation, start with simpler indicators.
Recommended Beginner Indicators
| Indicator | Difficulty |
|---|---|
| EMA Cross | Easy |
| RSI | Easy |
| Supertrend | Easy |
| MACD | Medium |
| Bollinger Bands | Medium |
Common Mistakes to Avoid
1. Wrong Webhook URL
Incorrect webhook URLs prevent execution.
Always verify carefully.
2. Incorrect Alert Message
JSON formatting mistakes can break automation.
Double-check syntax.
3. No Risk Management
Never automate without:
- Stop losses
- Position sizing
- Capital limits
4. Over-Optimization
Avoid changing indicator settings too frequently based on recent performance.
Benefits of Automating Pre-Built Indicators
Faster Execution
Trades execute instantly.
Emotion-Free Trading
No fear or greed during execution.
24/7 Monitoring
Automation works continuously even when you're offline.
Easy to Scale
You can automate multiple strategies simultaneously.
Final Thoughts
Using pre-built indicators with TradingView and MIRRORPIP is one of the easiest ways to start automated crypto trading.
Even beginners can:
- Create alerts
- Connect webhook automation
- Execute trades automatically
- Build systematic trading workflows
As your experience grows, you can move from simple indicator alerts to advanced algorithmic trading systems.
You can watch full video tutorial here :